The winter holidays are here, and Christmas is just around the corner, so naturally, we had to make something with the holiday in mind. This article shows how to make your own LED Christmas tree lights using an Arduino
Not using a real Christmas tree is a key detail to remember. This is a simple do-it-yourself project for anyone interested in fusing Arduino and the holiday season. Let’s dive in right now.
Circuit Diagram of DIY Arduino Christmas Tree Lights
The circuit diagram for the Arduino Christmas Tree Lights Project doesn’t amount to much, as all it requires is the connection of a number of LEDs to the Arduino. We used 27 LEDs, but that could have ranged from 10 to 50 depending on the size of your tree.
Remember that we only have one LED on at a time and that we have wired all the others directly to Arduino.
We chose a 66 matrix with 6 Cathode or GND pins and 6 Anode or VCC Pins, which makes the wiring of the LEDs quite interesting.
IMPORTANT: Due to space constraints, we could only use 27 LEDs on the Christmas tree.

Components Required
- Sunboard Sheet (or any thick cardboard)
- Cutter
- Glue
- LEDs (# – depending on the size of the tree)
- Glitter and other decorating stuff
- Insulated Copper Wire
- Arduino Nano (UNO or Mega, anything is fine)
- Power Supply
Christmas Tree Design
As it was mentioned before, constructing the circuit is the hard part. For this exercise, I’ll demonstrate how to construct a basic Christmas tree.
Draw a Christmas tree layout on one of two Sunboard sheets (each is about the size of an A4 sheet). Use the internet as your go-to source for information.

Use a cutter to remove the tree shape from the Sunboard. Be careful when using the cutter as it is a very sharp tool.

Here’s what you should do: on the other Sunboard, lightly sketch the tree’s outline. If you’re already cutting wood, you might as well cut this board. Create something that can act as a branch for the tree.

Put a line through the trunk of the tree at the centre of each puzzle. LEDs can be placed at the marked points, two in one tree on either side of the line, and one in the other tree at the centre. Make holes in the tree with a drill or other pointed tool. These are the spaces where the LEDs will go. In other words, the holes need to be big enough.
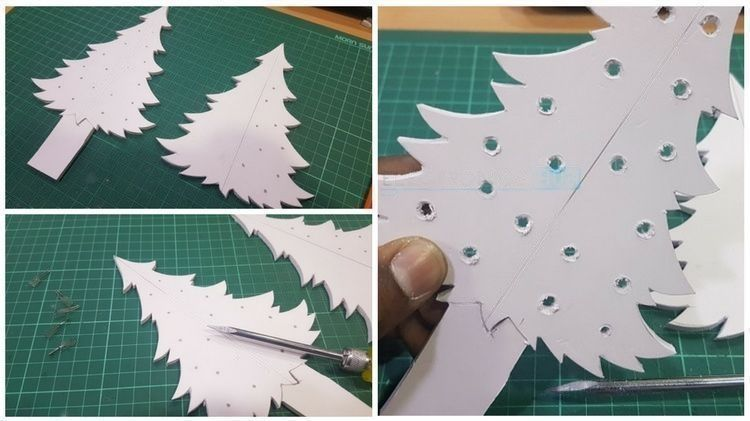
Cut the tree in half along the line we drew earlier after marking holes for LEDs on one side. Connect the pieces to the other tree using quick glue, following the diagram. The finished product will resemble the diagram on the bottom right.

Furthermore, glue a temporary supporting base to the end of the branch and secure it to the tree, allowing the tree to stand securely.

We’ve strategically placed the LEDs so that their anodes all point in the same direction. This will simplify the process of wiring the LEDs.

When it came time to connect the LEDs together, we used some insulated copper wire that we salvaged from a broken motor. The reason for using this wire is that they can be twisted without any short circuit.

Start soldering the wire to the LEDs after briefly removing the insulation from the areas you’ll be working on. It’s a 6×6 matrix, so there will be 6 ground wires and 6 power wires total.
Put the wires in a neat pattern and adhere them to the base. The completed structure will resemble this in general layout.

Make sure that there are no wires left loose or hanging. Bunch the wires together and lay them flat at the base. All 12 of these wires must be connected to an Arduino.

Let’s construct the bottom first, then attach the wires to the Arduino. Attach two additional Sunboard sheets to the bottom of a smaller sheet to create a base. Take the tree down from its temporary base and re-root it into the permanent one.

Cut a slit next to the trunk of the tree and stuff the wires inside.
The soldering process continues. Connect any Arduino board (UNO, Nano, or Mega) by soldering the wires (six GND and six VCC) to male headers.

Put some glue on a brush and spread it around the area. Always proceed with caution and a light touch. After covering the entire surface with glue, decorate it with green glitter. Please allow it to dry before proceeding to the other sides.
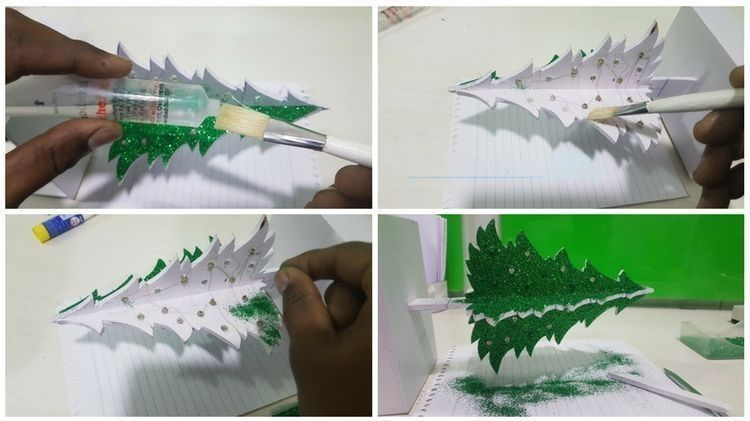
After the glitter has been securely adhered, you can proceed with decorating it for Christmas by sticking on a star, Rudolph the red-nosed reindeer, some colourful balls, and a “Merry Christmas” sticker. This is how the Christmas tree will look when it’s been decorated.

Project Procedures
This guide will show you how to use an Arduino to create some basic Christmas tree lights. Putting the plan into action is a breeze.
Connect all the LEDs to the Arduino; there are six GND pins and six VCC pins for this purpose. Write code to make the LEDs do cool things. Please enjoy yourself and have a happy holiday season.
Please take note that we have the Arduino set up so that only one LED is on at any given time.
Conclusion
I hope all of you find this simple DIY Christmas LED light project simple. MATHA ELECTRONICS will be back soon with more informative blogs.
